A Guide on How to Hook Up a Thermocouple

Appliance Reliance • December 21, 2023


Thermocouples, those tiny temperature wizards, are the unsung heroes in our quest to measure the heat and chill of the world around us. Whether you're delving into a DIY project or navigating the industrial landscape, connecting a thermocouple might seem like a mystifying task. Fear not! In this guide, we'll unravel the steps to seamlessly hook up a thermocouple, turning the arcane into the accessible.


Understanding the Players: Copper and Constantan

The core of a thermocouple is its dynamic duo of metals—copper and constantan. These metals join forces at a critical juncture, and it's this meeting point that holds the key to unlocking the temperature secrets.


The Tools of the Trade

Before we embark on our thermocouple adventure, ensure you have the right tools at your disposal:

  • Thermocouple:  Choose the right type for your application (K, J, T, etc.).

  • Connector:  A connector compatible with your thermocouple type.

  • Extension Wire:  Often necessary for extending the reach of your thermocouple.

  • Temperature Monitoring Device:  This could be a simple thermometer or a sophisticated data logger.


Steps to Hooking Up a Thermocouple:


1. Identify Thermocouple Type:

Know your thermocouple's alphabet soup (K, J, T, etc.). This ensures compatibility with the equipment you're connecting it to.

2. Prepare the Extension Wire:

If needed, use extension wire to increase the reach of your thermocouple. Ensure the extension wire matches the type of your thermocouple.

3. Connector Connection:

Connect the thermocouple wires to the corresponding terminals on the connector. Follow the color-coding or markings to ensure proper alignment.

4. Secure the Connection:

Once connected, secure the joints using appropriate tools, ensuring a snug fit without damaging the delicate wires.

5. Connect to Monitoring Device:

Plug the connector into your temperature monitoring device. Whether it's a digital display or a data logger, make sure the connection is secure.

6. Test the Setup:

Before deploying your thermocouple into the wild, conduct a quick test. Ensure the temperature readings align with your expectations and the environment.


Tips for Success:

  • Avoid Unnecessary Stress:  Handle the wires with care. The wires are sensitive, and undue stress can affect the accuracy of your temperature readings.

  • Mind the Polarity:  Thermocouples are polarized, so ensure you connect the wires with the correct polarity to get accurate readings.


Conclusion:

Congratulations! You've successfully embarked on a journey to hook up a thermocouple. With the right knowledge and tools, you've transformed what might have seemed like a complex task into a manageable feat. Now, armed with your thermocouple, go forth and explore the temperature wonders of the world, one accurate reading at a time.

By Appliance Reliance June 28, 2024
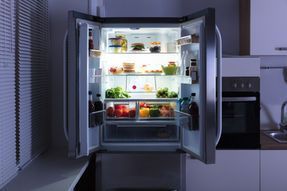
This is a list of possible problems and repair solutions that arise in a refrigerator that is not cooling.
By Appliance Reliance August 3, 2023
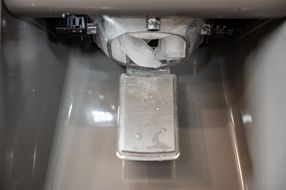
Modern refrigerators with ice and water dispensers are a convenient addition to any kitchen. However, it can be frustrating when you go...
By Appliance Reliance August 3, 2023
Frigidaire side-by-side refrigerators are known for their innovative design and reliable performance. However, like any other appliance,...
By Appliance Reliance December 27, 2022
Circuit: A complete path through which electricity can travel. "Closed" circuits allow electricity to flow. In an "open" circuit, there...
By Appliance Reliance November 21, 2022
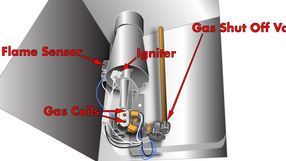
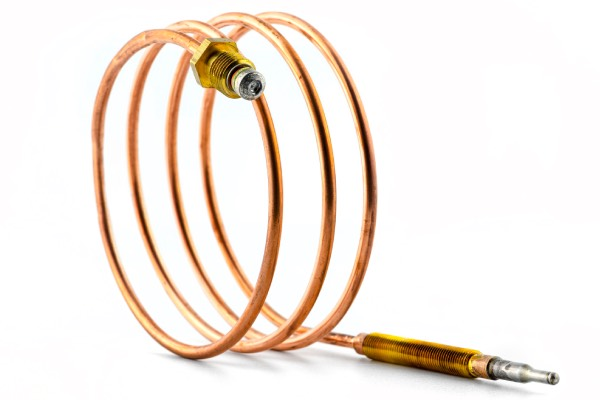
Checking the flame detector The gas dryer blows air through the burner to heat it. The burner assembly consists mainly of a gas valve, an...
By thesemedge July 1, 2022
Whether your refrigerator is making strange sounds or you notice leaks or other issues coming from it, the solution might be simple.